
This time post we will discuss in full about Running Text using Dot Matrix 8×8.
Running text is display digital the that contains information example text or images
Materials needed are as follows:
· Arduino Uno
· Arduino IDE software link:
· Dot Matrix Led Module 8 × 8 (MAX7219 Displays)
· Jumper Cables
· Dotmatrix link program:
schematics wiring Arduino uno with Dotmatrix MAX7219 as shown images below :
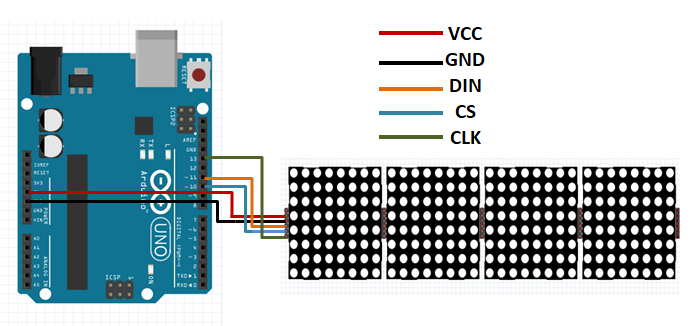
Configuration pin
CLK_PIN 13
DIN_PIN 11
CS_PIN 10
Vcc_PIN 5v
Gnd_PIN Gnd
Follows step by step:
Install Arduino IDE until complete.
Extract The program that was downloaded earlier by extracting it here.
Save the extract to the folder: C: \ Program Files \ Arduino \ libraries
Open folder: C: \ Program Files \ Arduino \ libraries \ MD_Parola-master \ example \ Parola_Scrolling.
Or open the Arduino application that has been installed:
- a. Select file
- b. Example
- c. MD_Parola
- d. Parola_Scrolling
Change the text as desired:
char newMessage [BUF_SIZE] = {“WELCOME TO MY OFFICIAL CHANNEL ACHIGAWA”};
- e. Check
- f. Connect Arduino uno with a laptop or PC check list connect at Tools
- Board >> Arduino/Genuino Uno
- Com/Port
- g. Upload
h. If using 2 Max7219 (8×64) it must be changed
define MAX_DEVICES 4
to 8
GOOD LUCK. BYE BYE
